How To Remove Green Screen In Kinemaster.
Today in this blog post we will learn How to remove Green screen in Kinemaster. If you are a video creator, and you are making videos for YouTube and Facebook. Then you need to learn good editing skills, and you also need some good editing apps or software to complete your work. There are many apps and software on the market, but Kinemaster is one of the best video editing apps. This app provides a high-quality editing experience with a 4K export option.
Kinemaster video editing app has two versions for all types of users: free and paid.
The free Kinemaster version has basic editing tools, but in the pro version, you will get more high-quality editing tools such as a video cut tool, an audio cut tool, a voice recording tool, a 4K export option, greenscreen editing, and more.
Many video creators use green screens to shoot their videos, but they don’t know how to remove green screen in Kinemaster. so today in this blog we will learn how to how remove green screen in Kinemaster.
If you want to remove the green screen (chroma key) in Kinemaster mobile editor, you can follow these steps:
How To Remove Green Screen In Kinemaster.
Import your footage: Launch Kinemaster Mobile Editor and create a new project. Import the video or image you want with the green screen background that you want to remove. Then add it to the timeline.
Add the background: next Import or create a new background you want to replace or change with the green screen. Place it on a track below the green screen clip in the timeline.
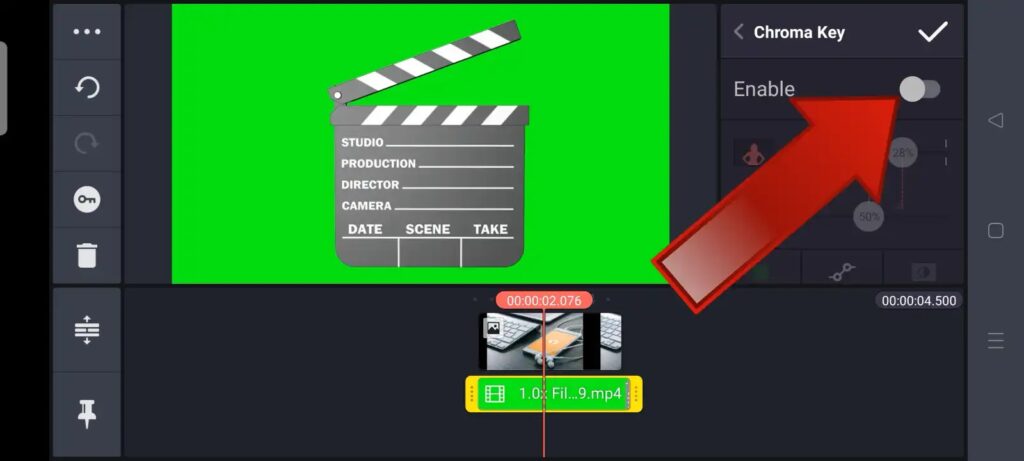
Apply chroma key effect: after adding the background, click on the green screen clip in the timeline to select it. Then, click on the “Layer” button and select “Chroma Key” from the menu bar.
Adjust chroma key settings: after doing all the setup, now go to the chroma key settings panel, where you’ll find various options to fine-tune the effect. The specific options and controls may vary depending on the version of Kinemaster you’re using. you’ll find options like key color, tolerance, edge smoothness, and shadow. Adjust these settings until the green screen is effectively removed and your foreground subject appears on top of the background.
Refine the effect: To further refine the chroma key effect and minimize any remaining green spill or artifacts around the subject’s edges, use additional settings like Spill Suppression or Colour Range.
Preview and adjust: Okay, now play back your project video to see the real-time result. If needed, go back and make more adjustments to the chroma key settings until the green screen is removed to your satisfaction.
Export the video: OK, after removing your complete green screen and you’re happy with the result, tap on the export button to export and save your video in phone storage with the green screen removed. Choose your video export settings and export format, then wait for the rendering process to complete.
Ok, so this is your first way to remove your green screen in the Kinemaster mobile app. I hope this post will help you learn how to remove green screen in Kinemaster. Try all these steps to remove your green screen in Kinemaster. Also, you can watch a video and learn from a complete tutorial.
Ok, so if you are not satisfied with this way, no worries; we are sharing more ways to remove your greenscreen from your videos. Ok, let’s go with the second semester.
3 Ways To Remove Green Screen
If you want to learn how to remove green screen in Kinemaster, then there are multiple ways to remove a green screen in Kinemaster. Here are a few different methods you can try to remove your green screen in Kinemaster:
1. Chroma Key: if you want to remove green screen in Kinemaster then the Croma key is the most common and easy method to remove green screen in Kinemaster. Follow the steps mentioned in the previous response to apply the Chroma Key effect and adjust the settings until the green screen is effectively removed.
2. Masking: ok there is another way to remove a green screen is by using masking techniques. Here’s how you can remove the green screen in Kinemaster:
| 1st step – Import your all photos and videos in Kinemaster with the green screen background and place them on the timeline. |
| 2nd step – Add the new background you want to use on a track below the green screen clip. |
| 3rd step – click on the green screen video clip to select it, then click on the “Layer” button and choose “Mask” from the menu. |
| 4th step – Use the easy masking tools to draw a mask around the subject in the photos and videos, excluding the green screen background. |
| 5th step – Adjust the mask as needed to ensure it accurately covers the subject. |
| 6th step – Preview the video and make any further adjustments if required to remove the green screen. |
3. Split Screen: The split-screen method can be used to simultaneously display both the original footage and the background without completely removing the green screen.
Here’s how:-
| a. Import your footage with the green screen background and place it on the timeline. |
| b. Add the background you want to use on a track below the green screen clip. |
| c. click on the green screen clip to select it, then tap on the “Layer” button and choose “Split Screen” from the menu. |
| d. Adjust the split-screen settings to position and resize the clips as desired. |
| e. Preview the video and make any further adjustments if required. |
4. Kinemaster Mod Apk: if you want to remove your green screen using the Kinemaster app, then you need to subscribe to pro plans. you can’t use the chroma key tool in the free version. but don’t worry we have an option for you, you can download Kinemaster Mod Apk to use all pro tools for free.
What Is Kinemaster APK?
Kinemaster is a video editing app, this app offers free and paid versions to their user. Users can download this app and they can use the free editing version to edit their youtube and Facebook videos.
in this app, you can use many free and paid features to generate high-quality videos, to impress your audio. with the Kinemaster app, you can Import/Export Data, Social Media Integration, Animations & Transitions, Audio Capture, Color Grading, Content Library, and Image & Media Library.
in addition futures, you can import your video in 4k format, also can make changes in the background, remove your green screen in one click, and change your background according to your requirements.
Note: – If you want to use all these future you need to subscribe to a pro plan, but today here we are providing you with Kinemaster Mod APK. This is the mod APK of Kinemaster.
Using Kinemaster Mod APK you can use all Kinemaster pro futures without paying any fees, you can edit your video, and import in 4k format.

| App Name | KineMaster Pro |
|---|---|
| Size | 86 MB |
| Version | v7.0.4.30130.GP |
| MOD Info | Premium Subscription |
| Compatible with | 5.0 or higher |
| Price | Free |
| Category | Video Players & Editors |
| Google Play link | Play Store |
| Installs | 100M+ |
| Reviews Rating | 4.4 |
| Developer | Corporation |
| Update | 28 May 2023 |
Download the Latest Version (v7.0.4.30130.GP)
Note – this Kinemaster Mod Apk is only for mobile users, all mobile devices can use this app without making any payment.
These are just a few methods you can use to remove a green screen in Kinemaster. you can Experiment with different techniques and settings to remove your green screen in Kinemaster. The availability of specific features and options may depend on the version of Kinemaster you are using.